 Grégory TAUDIN - Jun 2, 2022
NestJS: Installation and creation of a monorepo project with CQRS architecture
NestJS copies some internal concepts from Angular, from which it takes the MVC architecture and its main patterns, TypeScript for programming and finally uses Express or Fastify for the HTTP service part.
Therefore it allows, like its model, to recover a very integrated and proven technical stack, containing a set of functionalities ready to be used and self-sufficient.
In this story, we are going to design an API that will allow us to understand the basic concepts of NestJS as well as the implementation of some very cool features!
One of the immediate advantages of NestJS: It allows you to build a REST API or micro-services very quickly.
Installation
Before starting our NestJS exploration, we need to install some required stuffs:
- NodeJS 16
- NPM
- Visual Studio Code (VS)or another IDE, as you want!
We need to create a new folder wo will contain your future NestJS repository. From VS, open a terminal and use this command:
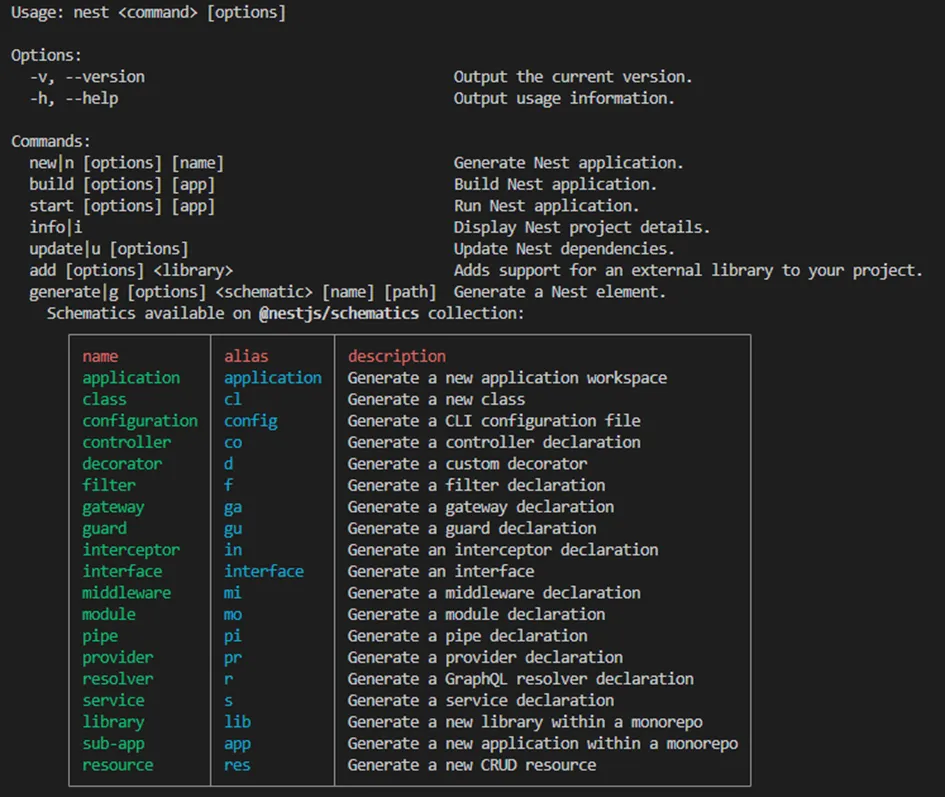
> npm i -g @nest/cliAs you see, we install the CLI of NestJS in global mode. Now, in the same terminal use the Nest CLI command:
> nestThe CLI displays a message and shows you all structural elements you can generate:
You are able to create a new project. Now use this command:
> nest new my-technical-stackGo inside "my-technical-stack" folder and notice the projects structure:
- src folder contains our application
- test contains the E2E (end to end) tests.
Next, you'll find 4 files:
- prettierrc: the prettier configuration file, Prettier is a code formatter.
- nest-cli.json: NestJS CLI configuration file.
- package.json : NodeJS configuration file.
- tsconfig.json: TypeScript configuration file.
Your first NestJS is now done ! By default, the NestJS CLI generates a REST like API. Use this command to launch the app:
> npm startThe NestJS HTTP server launches the app on 3000 port. Input the address http://localhost:3000 in your favorite browser address bar and enjoy a beautiful "Hello world" in the page.
Come back in VS code and open the "src" folder. Inside you'll find 5 files:
- app.controller.spec.ts: unit tests file.
- app.controller.ts: application controller file.
- app.module.ts: application module file.
- app.service.ts: application service file.
- main.ts: application bootstrap file.
If you look inside the "main.ts", you'll find an async function "bootstrap", it bootstraps the application and launches the web server on 3000 port. Notice the object "NestFactory": this object is a factory and can create different types of application :
- NestFactory.create(AModule): create a HTTP REST application.
- NestFactory.createMicroservice(AnotherModule, {}): create a microservice application.
In the file "app.module.ts" the @Module decorator allows you to create the application module. Inside you can define the controllers, the providers, and imported module.
The "app.controller.ts" defines the application controller. You will find a new decorator "@get()" which defines the type of HTTP verbs the controller used to call the method "getHello()".
Super efficient!
Monorepo
What is the monorepo?
In version control systems, a monorepo ("mono" meaning 'single' and "repo" being short for 'repository') is a software development strategy where code for many projects is stored in the same repository. This software engineering practice dates back to at least the early 2000s when it was known as a 'shared codebase'. A related concept is the monolith, but while a monolith combines its sub-projects into one large project, a monorepo may contain independent projects.
Ok, it's time to switch on monorepo strategy! Inside "my-technical-stack" open a terminal and use this command:
> nest generate app readerAutomatically, the Nest CLI switches on monorepo pattern and updates the folder structure of the previous application. A new folder "apps" appears and, inside, you can find 2 applications:
- my-technical-stack: the old one.
- reader: the new one.
Let's add a new third application:
> nest generate app writerand to conclude, let's add a shared library:
> nest generate lib shared
(For the message: What prefix would you like to use for the library? chose default: @app)
It's time to talk about CQRS architecture!
CQRS
CQRS stands for Command and Query Responsibility Segregation, a pattern that separates read and update operations for a data store. Implementing CQRS in your application can maximize its performance, scalability, and security. The flexibility created by migrating to CQRS allows a system to better evolve over time and prevents update commands from causing merge conflicts at the domain level.
How to choose this approach?
In many domains, read-type services are often overloaded compared to write-type services (in eCommerce for example)). It is essential that the scalability of read-type services be different from write-type services. Another important point is the structure of database behind this 2 services, a read service can use a unstructured database (using no-sql) with a flat structure to increase the speed of IO while a write service need to write data in a structured database.
If you look inside the apps, we have an application for the reader access and another one for the writer access. The shared library is there to share (like its name suggest..) different common resources.
Some adaptations must be made before reaching this goal! In each application on "main.ts" files, we need to put a different port (3000, 4000, 5000). Then, we need to import the shared library into each module.
Inside "apps/reader/reader.module.ts" and "apps/reader/writer.module.ts", update the code like bellow:
The last step consists on update the "package.json" file to add 2 news builds:
Add this 2 new lines and update the build line:
"build:reader": "nest build reader",
"build:writer": "nest build writer",
"build": "nest build && nest build reader && nest build writer".
Open a terminal and test the 2 new commands:
> npm run buildOpen the "dist" folder. Inside, you will find 3 folders with your 3 applications. Note that all are completely autonomous (with the shared lib inside the compiled code) and can be docked.
Mission complete!
The project skeleton is ready, we can implement some great features now! We can think about the next part: The code first approach with TypeOrm.